
Maximize Wheel Width: Gen 2 Toyota 86 & Subaru BRZ Rear Quarter Modification
Article | 03/05/2025 by Matt Thompson
Updated on 03/10/2025
The second generation 86/BRZ made its debut for the 2022 model year and it was met with near-universal acclaim. The Gen 2 cars received an all new exterior design, a higher quality interior, and a significant bump in horsepower–the biggest complaint about the first generation cars. Top it off with a near-identical curb weight to the old car and a $30,000 starting price, the Gen 2 might just be perfect… …as a stock car. Enthusiasts have a bad habit of tinkering with the formula, often creating our own headaches where there may not have been one had we left the car alone. For the Gen 2 Twins, the rear quarter clearance is one of those headaches. For a bit of context, it was extremely common to run 9.5-inch wide wheels on the Gen 1 86/BRZ. Whether the goal was to fit a wide tire for the track, to have a really aggressive look for the street, or some combination of the two it quickly became a go-to option for those cars. With the arrival of the second generation, new owners quickly rushed to install similar fitments, but were unfortunately met with a roadblock.
The Rear Quarter Issue

The rear quarter on the Gen 2 has a small tab that at first glance, looks like it might allow for more wheel clearance in the rear. On closer inspection it actually costs us quite a bit of room compared to the Gen 1. Unfortunately, copying and pasting the old formula will not work for those looking to run wide wheels and tires on their Gen 2. However, there are options! The first is to switch to a higher-offset wheel, such as our 17x9” ET48 or a more narrow wheel, such as our 17x8.5” ET44. The second option is the reason you’re reading this article: Trim off the material that causes the clearance issue in the first place. While some may be hesitant to cut into a new car, when done properly this modification is invisible to the naked eye.
A Closer Look Let’s take a look underneath the rear quarter panel at the problem area.


From this point we’ll need to remove a few clips to peel back the fender liner.

After carefully removing the highlighted clips–emphasis on carefully so they don’t break–we can peel the fender liner back just far enough to remove the plastic cover.

A bit of force on the little pins later, and the plastic cap comes right off. Again, a bit of force as we don’t want to cause permanent damage.

With the plastic cover removed, we’re now left with the metal lip. This is where we do want to cause permanent damage.
What Is Actually Happening Before making permanent changes, we wanted to take a moment to really analyze why the quarter panel trim may be necessary. Here are some images that represent the potential contact issue.


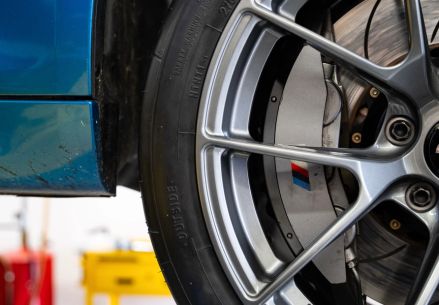
This is our 17x9” ET35 VS-5RS. For the current and former Gen 1 owners out there, you may already know that this was a very popular fitment for those cars alongside the 18x9.5” options. At first glance, it looks great! A nice, flush fitment.
Pictured:
17x9 ET35

Pictured:
17x9 ET35

Upon closer inspection, the problem becomes clear. The small piece of metal where the plastic trim mounts will contact the rear tire under suspension compression. (Note, the vehicle in the photos has -3.5° rear camber. Even an aggressive alignment won’t eliminate the issue!) Compared to our higher offset 17x9” ET48 wheel shown below with the same tire. These higher offset wheels bring the setup 13mm more inboard.
Pictured:
17x9 ET48

Pictured:
17x9 ET48


Again for those who may not be eager to trim material off of their vehicle, going with a high-offset wheel as an alternative will allow for similar tire width in a much easier package to run. For those looking to bring their car under the knife…
Pictured:
Before
Pictured:
After

This photo provides a great idea of what an ideal cut looks like, optimizing clearance without removing more material than necessary. Next is trimming the plastic ‘cover’ for additional clearance…
Pictured:
Before
Pictured:
After

If done properly, the plastic cover should be able to secure to the vehicle using one of the plastic pins and double-sided tape. After re-installation, the modification should be invisible to the naked eye.
The Result With the modification complete, you’ll be able to run lower offset wheels and wider tires without rubbing in the rear. Or if you’re simply looking for a flush street setup, you can achieve that too. If you’re looking for a direct fit option or want to review our top recommended fitments for the Gen 2 86/BRZ chassis, be sure to check out our fitment guides here.

Tags
 Matt Thompson
Matt became the JDM Product Expert at APEX Wheels in 2022. Prior to joining APEX, he worked extensively in automotive sales. As an enthusiast he made the shift from street driving to track driving in order to fully experience his cars at the limit without putting the public at risk. Matt has owned six Hondas (‘94 Integra LS, ‘95 Integra RS, ‘96 Integra GS-R, ‘06 RSX Type-S, ‘95 Civic VX, ‘17 Civic EX-T), two Subarus (‘15 Impreza, ‘22 BRZ), and is likely shopping for the next addition to his stable. When he’s not helping JDM owners figure out the best wheel setups for their cars, he enjoys playing racing video games and indulging his interest in automotive photography. Fun fact: Matt knows every quotable line in The Fast and the Furious by heart.
Have questions about wheels for your JDM vehicle? Use our contact form and ask for Matt.

Wheel Fitment. Launch Alerts. Real Info Only.